
Barista Technique: Frothing Milk
Milk drinks are only a small part of Italian espresso culture; whereas in most of the US, people have oversized milk drinks that even an anthropologist would never classify as cultured. But in a few cafés around the world, baristas are using milk as a paint and espresso as a canvas to create beautiful and wonderful tasting latte art.
The best and most practiced professional baristas can create quite stunning patterns that a home barista will not be able to emulate. But with some months practice, you can learn to properly froth the milk, and pour basic heart and rosette patterns in 6 or 12 ounce cups. There is no easier way of convincing your friends of your espresso expertise than casually serving them an artfully poured latte.
Correctly frothed milk = microfoam = wonderful cappuccinos
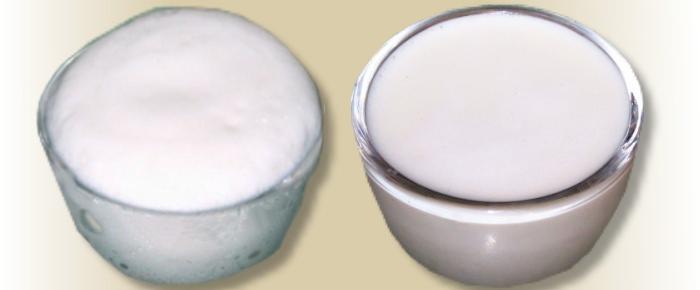
Proper cappuccinos and lattes require microfoam—a pourable, virtually liquid foam that tastes sweet and rich. The pouring consistency runs from completely liquid for latte art to a slightly thickened sauce for traditional cappuccinos. If the foam becomes thicker, like soft peak beaten egg whites, its taste turns to cardboard, and its appearance in the cup suffers. Microfoam in the pitcher does not look like a foam, since the bubbles are too small. The only distinction it has from liquid milk is a soft, slightly spectral sheen in the right light. If the frothed milk has visible foam, it was incorrectly prepared. The picture below shows a bad foam (left) and a slightly thick microfoam suitable for cappuccinos (right).
Contrasting texture of poorly frothed milk (left) and properly frothed microfoam (right)
Frothing milk to a microfoam is very simple when you know how to do it, but it does take time to learn. Two processes occur when milk is frothed: first, when the tip is at the right depth, the milk is converted to microfoam; second, the milk is heated. These two do not happen at the same rate on every machine or tip design, so the point at which you transition from foaming the milk to simply heating it varies from machine to machine. Finally, the amount of steam varies from machine to machine too, so the time spent to heat enough milk for a six ounce cappuccino can go from 10 to 40 seconds.
Four things to learn
Where to put the tip: There are three zones distinguished by sound. In the first zone nearest the surface, the tip makes a bubbling noise and as it gets slightly deeper, a sucking or tearing noise. In the second intermediate zone, there is very little noise. In third zone near the bottom of the pitcher, the milk begins to roar loudly.
The tip should stay in the second, silent zone for the entire process. In order to create microfoam, position the tip at the top boundary, so you occasionally hear a sucking/tearing noise. Too much of the sucking/tearing noise and the foam will stiffen and not be micro enough. To just heat the milk after the foaming is done, position the tip near the lower boundary so you occasionally hear a roaring noise.
The milk in the pitcher should whirlpool or form a standing wave of turbulence in order to fold foam into liquid. With a one hole tip, angle the entry, and keep it close to the edge of the pitcher to rotate the milk into a whirlpool. With a multi-hole tip, point it straight down and keep it near the center of the pitcher—the hole dispersion pattern on a properly designed tip will create a whirlpool or a standing wave of turbulence for you. If your multi-hole tip does not do this, change it for another, or block some holes and convert it to slower, single hole use.
How long to foam: As the liquid turns to foam, the volume of the milk increases. This is called stretching. Keep foaming until the milk has gone up about 50% in volume. If you foam more than that, you will get a light microfoam for the classic cap-on-top cappuccino, but latte art will be impossible. Typically, the side of the pitcher will be lukewarm (40°C, 100°F) at this point. However, volume increase is a far more reliable indicator, and with some frothing setups, one even keeps the tip at the foaming point until the milk is fully heated.
How much longer to heat the milk: The milk should be heated to about 70°C (160°F), which is just below the point where protein curdles and the foam is destroyed. The easiest way to do this is to hold one hand on the side of the pitcher and stop when it gets uncomfortably hot. If the milk suddenly increases in volume, the proteins are curdling, and you've gotten it too hot. With experience and a slower frother, you can hold the pitcher by the side rather than the handle and have your other hand free (it also helps to have a higher pain threshold!).
Related Posts

Barista Technique: Pouring Latte Art
On a single boiler home machine, some people prefer to froth first and then make the espresso. In th..

2018 World Barista Champion
WCE Certified Judges from around the world evaluate each performance on the taste of beverages serve..

Home roasting Vietnamese coffee
Coffee culture has been a deeply rich part of Vietnamese life for the better part of the last hundre..